Showing posts with label stone setting. Show all posts

Wednesday, June 3, 2020

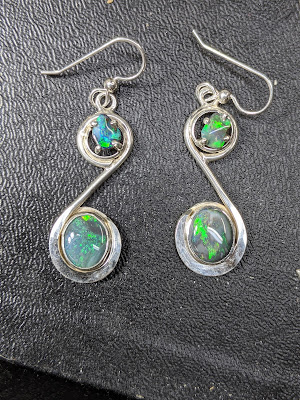
Custom Opal Earrings

This project came to me from a friend who had some opals that he bought a long time ago on a trip. He now wanted to make a pair of earrings for his wife. We weren't able to get together so this project was done totally online. I first did several sketches and narrowed that down to 4. Then I made a few sketches with wax wire to get it an idea of how the stores will work. I emailed the pictures and they picked the variation that they wanted. Now I was ready to translate the idea into silver. The trickiest part of this project was building a setting for the opal chunks at the top. I fabricated them from wire and made them look like they were suspended in the space. This whole piece so there was no casting involved.
It was done with round silver wire but I forged it down to get some taper and a little texture to the wire.
 She loved them! This was a custom project so it's not on my website.


The trickiest part of this project was building a setting for the opal chunks at the top


Monday, August 6, 2018

Forest Life pendant with sugilite and Amethyst


This pendant was made for my forest life series. I used a heavily hammer textured piece of silver for the backing. It reminded me of a leaf that had been on the ground for some time. I forged a silver wire into the shape of a curling vine. The round amethyst at the bottom to finish and give the eye a resting and a way to keep from going off the design.


Setting the big stone


Monday, April 17, 2017

Beach Pebble Jewelry


Today I started culling through one of my bags of beach pebbles to look for something that I could use for a repair job. The customer had lost one of her post earrings with dangle beach pebbles. I was trying to find a pebble to match the remaining earring, but didn't have any luck. I did find one small basalt pebble thick enough to cut down the middle to make a bookmatched pair. That's when the repair job turned into a custom job. I used a cut off disk to grind through the pebble and slice it down the middle.


Here is the finished pair.


I really enjoyed working with beach pebbles again. I don't get to do this as often as I would like. I have a stock pile of ocean tumbled pebbles from nearly clear quartz to black basalt, and every color in between. I've collected these pebbles from my travels along the East coast from Long Island to Florida. Contact me if you have any interest in beach pebble jewelry. I'm willing to work with any pebbles you have or we can sift through my collection to find the right match for your style. 

Check my website for samples of previous work involving beach pebbles. I've made a quartz heart shaped ring and a beach pebble crashing waves pendant


Friday, March 25, 2016

Building a setting

This project started out with a customer bringing me a Marquise shaped Stone. and a sketch.The stone was a shape and size then I couldn't buy a setting for so I decided to make one

I used a soft fire brick as my soldering pad and this allowed me to push the wire prongs into the pad and hold them in place in little notches I filed to hold them

After those were soldered I pulled it out of the brick and soldered on the bottom frame.  Unfortunately I don't have a picture of that, but you can see it in the next picture sitting on the solder pad. At this point I still have the prongs sticking down so I pressed them back into the fire brick to allighn it for the next solder joint.


I forged out the wings and added them to the setting.

At this point I pre finished the entire piece before setting the stone so I could get to the hard to reach places and not worry about the stone.


 The finished piece.  This was a custom made piece so it's not available for purchase.


Wednesday, June 4, 2014

This is one of the peices I've been working on that includes stones that I bought from a fellow artist at a "swap meet / flea market" for artists and art supplies. It was a fun day and I came away with a bunch of stones, some of which I don't even know what they are.  However I do know what this one is.  It's Charoite.  It comes from one place in Russia.
"It is a fairly recent discovery found in Russia in 1978 in the Murun mountains in Yakutia, near the Charo River. This is the only known location for this rare mineral. It ranges in color from a light lilac to a deep purple and can be mottled with gray, white and black inclusions. The chatoyant variety in a bright deep purple, is usually considered more valuable than the non-chatoyant variety although both are used in jewelry and compliment a number of other stones." from bernardine
 This is the domed side of a
 a 2 sided pendant
This big pendant is back set meaning the bezel was folded over the stone from the back and the "seat" that the flat side of the stone would sit on is now on the front   This makes this piece wearable either way

Thursday, February 16, 2012

Lariat project

This project was designed for a customer. He came to me with the idea for a lariat with a rounded triangle at the top and a stone at the other end of the chain. We worked together ,back and forth, to come up with the final design. Some of my students want to try something like this so I'm showing the steps. If there are questions, leave them as comments or as email

The first steps in this piece are not shown.  I used square cross section wire and used a file to make notches and bends where the corners are.  Then I could solder the corners without having to line then up. Only one join needed lining up.  I also soldered a 16 ga ring on the bottom of the bezel cup to allow for more soldering area . It gave me a place to put the edge of the frame. notice the chunk of pad holding up the frame while I solder it in possiton.
Holding it in a 3rd hand tool resting on the solder pad to steady the position.  (white paper for photo only, obviously, you can't have paper on the solder bench) 
I filed a small flat spot on top of the frame to give the top ring a place to attach. The ring itself is flattened on the bottom.  Easy solder is pre flowed on the ring.  Heat is appied to the frame and the ring brought in as the frame reaches temp.


For some reason the program wont let me write below the above picture.  The picture shows how I hold the jump ring that attaches the top ring to the chain for soldering.  The finished piece with a sardonix bead and set moonstone