Thursday, August 13, 2020

The Making of the Clydesdale buckle


The Clydesdale came obout when a customer called and wanted a heavy buckle.  All of mine were too light. He liked the style of the Workhorse but it was too light weight for his new alligator belt. Making it thicker and taller gave it the added weight and visual heft needed.


Tuesday, July 14, 2020

Bike Chain Bracelet

This bracelet happened when a customer came by with a bicycle chain. It was the whole chain.  It had been cleaned but I soaked it in spirits for a day or so and scrubbed it with a tooth brush to get all the old grease out. The end with the clasp was open as shown here but I had to cut the link off the other end. After grinding and smoothing the link down I fabricated the jump rings for both ends and soldered them on. the problem with doing a bracelet in steel is the rust that forms from the sweat and oils in the skin. The only finish I used on this one is wax.  Once the whole thing was given a brushed finish, I warmed up the bracelet and brushed on the wax so it would melt into all the joints. The customer was very happy with the way it turned out.  Not a complicated job but interesting!


www.jewelryartstudio.com

Wednesday, June 3, 2020

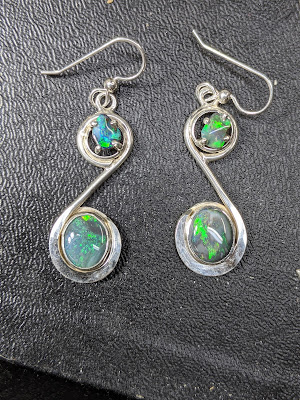
Custom Opal Earrings

This project came to me from a friend who had some opals that he bought a long time ago on a trip. He now wanted to make a pair of earrings for his wife. We weren't able to get together so this project was done totally online. I first did several sketches and narrowed that down to 4. Then I made a few sketches with wax wire to get it an idea of how the stores will work. I emailed the pictures and they picked the variation that they wanted. Now I was ready to translate the idea into silver. The trickiest part of this project was building a setting for the opal chunks at the top. I fabricated them from wire and made them look like they were suspended in the space. This whole piece so there was no casting involved.
It was done with round silver wire but I forged it down to get some taper and a little texture to the wire.
 She loved them! This was a custom project so it's not on my website.


The trickiest part of this project was building a setting for the opal chunks at the top


Wednesday, May 6, 2020

Buckle Alchemy

This project started when a collector called me to see if I could make a buckle for 1 1/2 belts from a spear head he found about 20 years ago. It all depended on how wide the spear point was of course so I had him send it to me. That size is pretty rare in a perfect condition spear point so I was pretty amazed when this beauty shower up.  
As luck would have it, this one was just barely wide enough for 1 1/2 belts.
I made an open face box mold with silicon and then made a wax impression from it


The wax is then changed into silver using the ancient process of lost wax casting. The wax model is surrounded with a special high temp plaster and the wax is burned out.  The hollow left in the plaster is then filled with the molten silver using centrifugal force or vacuum assist. Shown here is the rough casting after an acid bath to remove oxides from the surface leaving a layer of frosty white pure silver. 

Pictured here is the original stone point on the left and a bronze patinated casting. The bronze version looks a little smaller but that is mostly a camera thing. There is some shrinkage in the wax model as it cools and in the metal as it cools but it's not really noticeable  it still fit the 1 1/2 belts
This is a silver copy with the stone original. This project was for a custom limited edition buckle, It's not available on my site.
I have also made a buckle from a spear head found by my brother in New England. It fits 1 1/4 in belts.  You can see that here. I make it in silver and bronze.
If you have an object like a sharks tooth or arrow head or even a sea shell that you think would make a unique belt buckle, get in touch with me and we will see if I can perform some magic and turn it into silver.
 contact me at www.jewelryartstudio.com/studio


Thursday, April 9, 2020

A 3 year (so far) Custom Project

This Project started about 3 years ago when a customer wanted a special chain made to celebrate her 88th birthday. We came up with a design that incorporated the 88 into a Mobius infinity band.  I made a heavy silver link chain to go with it. The next year we went to a smaller link about the size of the ones I made for the chain. The 89 posed some design problems but we came up with something slightly abstract with the 9 sort of flipped to balance the  shape within the frame of the link. This year we returned to the link size to make the link for 90 but the customer wanted some gold. She had the idea that the number should be the gold in the shape of the Roman Numeral for 90. I also made an extra link for everyday wear. www.jewelryartstudio.com


I also made an extra link for everyday wear

Monday, September 23, 2019

1800 Buckles

I started making buckles when I started making metal jewelry back in the late 70's.  I think the first one was made from scrape bronze banjo pieces from when I worked at Stewart MacDonald. I made several when I went to Penland in the 80's as "tech samples"  for the lamination techniques I learned with Chuck Evans  I didn't start keeping track of them until I started the series of Fish Face buckles in 1998. That's when I started numbering them. I passed #1800 right at the end of the year (2018) .  At the beginning of 2019 I started posting the buckles with the # of the number as of this writing I'm on #1868. This is the Farrier in sterling for 1 1/2 belts. I have been posting the sold buckles with their numbers  on www.Instagram.com/@jewelryartstudio I'm posting the front and back of each buckle as I finish them.  Most buckles don't get signed and numbered until they are sold.  They are all, so far, part of my inventory of designs so they can be ordered through my websites. If you follow # on instagram you can follow #petersenesacart and see paintings and jewelry in one place.

You can sign up for my occasional news letter (I'll let you ) at www.jewelryartstudio.com and click on the pop up

Friday, September 6, 2019

New Trout Money Clip

I finally finished the new version of my trout money clip. It's on my website and the Etsy store. What took so long? I'm not sure but probably everything else took priority. I started from scratch so I had to re carve the design.  I made it longer and heavier and thicker at the tail and face where it was bending too much  I also think I made it more realistic and true to the actual fish. This is hard to do sometimes because the proportions of the fish don't always fit into a money clip dimension.

It holds a few bills, business cards and credit cards

I like to use them to have cards at the ready
It wont take a big roll but if you only have a few bills they can fold up and it will still have plenty of grip